Sunday, September 27, 2009

Princess Pointers

WAKE UP...it is time for another princess tutorial! This week's princess is Sleeping Beauty. Her popular pink gown has some very angular features. She has an off the shoulder pointed collar and a small, pointed peplum. These elements are actually very easy to add to the Simply Sweet jumper dress.


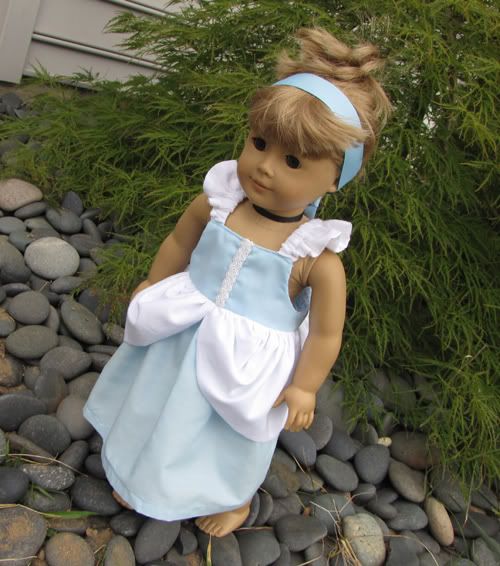
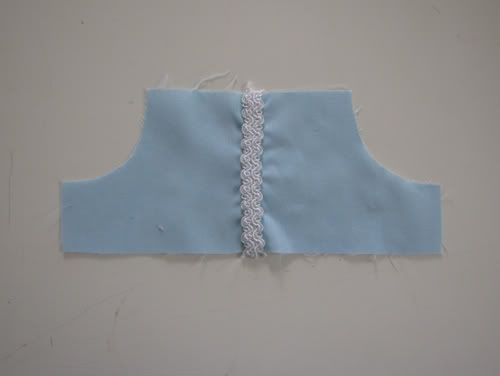
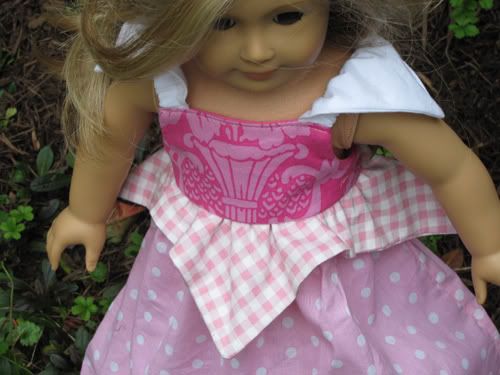
Dark Pink Bodice: I didn't add any embellishments or make any modifications to the bodice pattern. Rather, I let the fabric do all the work in making the bodice look formal and princess-like. I used Jennifer's gorgeous Amanda Fleur from her Pretty Please line. She has so many large scale, monochromatic damasks and florals that are absolutely perfect for this type of pattern play. Just center the design and you have instant interest!

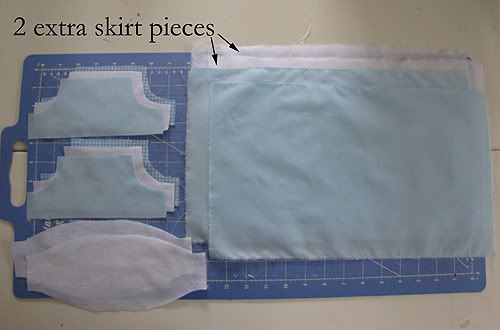
White Straps: The straps are a modification of the ruffled elasticized straps included with the pattern. Print out the desired size, but don't cut.


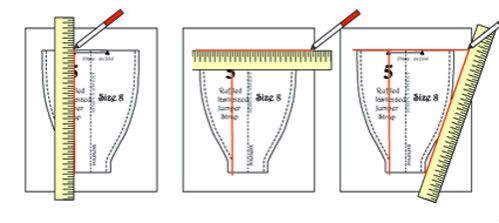
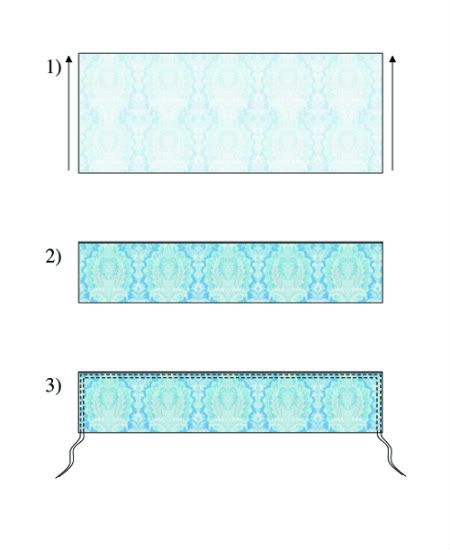
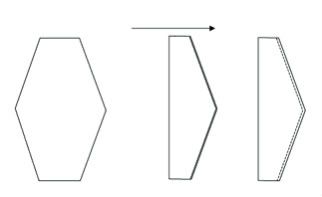
The first step is to draw a new lengthwise foldline. Using a straight edge, draw a line at the position of the seam allowance (dashed line) on the bottom left hand side. Then, align the straight edge with the top edge and extend the line over to the right hand side. Finally, connect the bottom right hand corner to the end of top line.


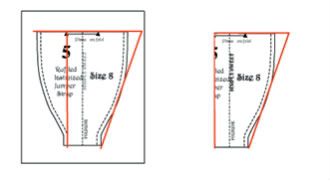
Cut out the modified pattern. The original pattern is cut on one fold, but this one will be cut on 2 folds (this is because we only traced one side of the pattern).


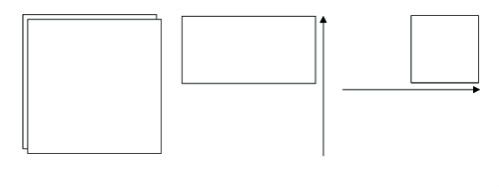
Stack 2 pieces of white fabric together and fold in half. Fold in half again so that you have 8 layers.


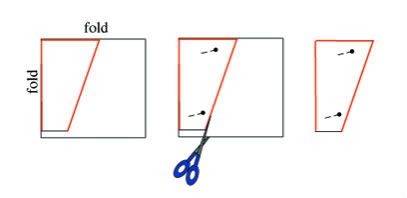
Place the new foldline edge and the top edge of the pattern on the folded edges of the fabric. Pin into place. Cut around the bottom and slanted side edges.


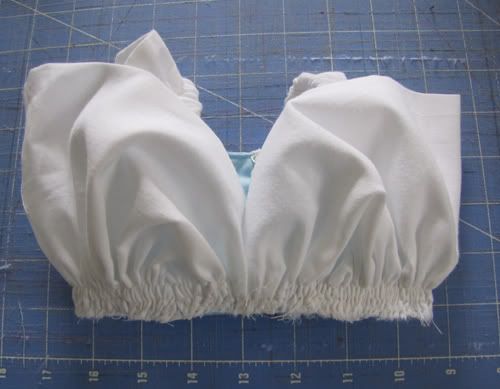
Unfold and separate the strap pieces (which should look like tall hexagons). Fold each piece in half lengthwise, right sides facing inward. Stitch 1/4" from the slanted side edges.


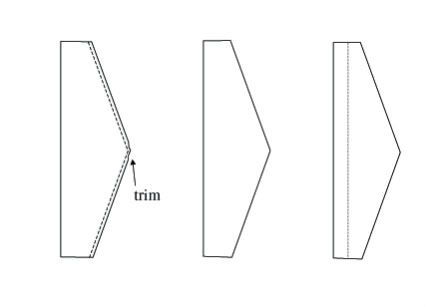
Trim the seam allowances near the point. Turn right side out. Stitch 7/8" from the folded edge to form the casing (1/2" for dolly).


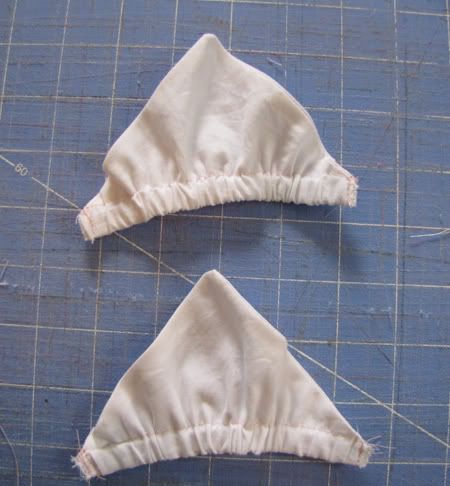
Add the elastic as described on page 15 of the eBook.


Insert the straps as described on page 16, but have the seamed (pointy) edges facing inward rather than outward.


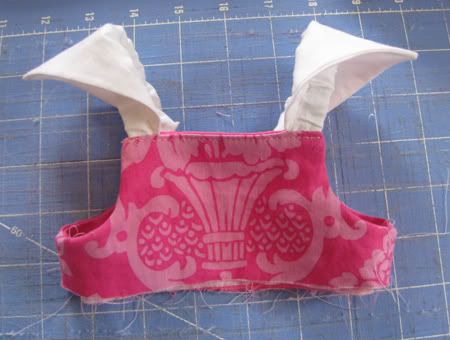
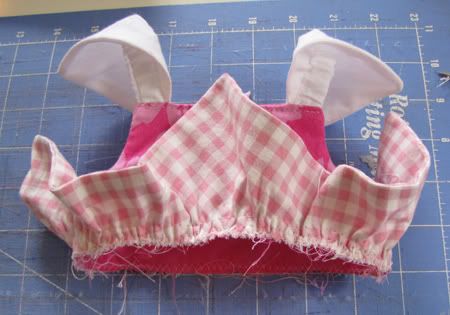
Turn the bodice right side out and flip the pointed edges out to the side.
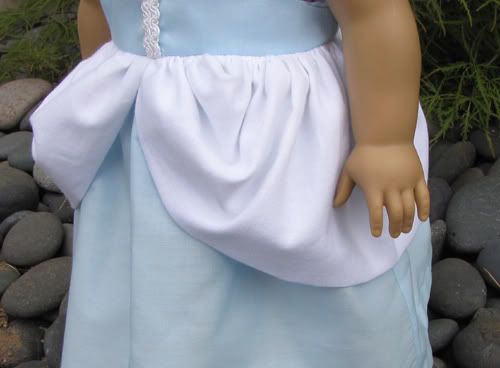

Light Pink Peplum:
Cut two squares of pink fabric for the peplum. The dimensions I recommend are:

Little girl (6m - 3y) - 13" x 13"
Big girl (4 - 8) - 15" x 15"
Dolly (15" - 18") - 9" x 9"


Place the squares together, right sides facing and align all of the edges. Stitch 1/4 from the edges, all the way around.


Fold the stitched square in half, and then in half again. Press the folds with an iron to make nice, visible creases.


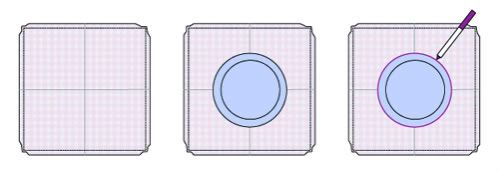
Unfold the stitched square. Using a plate as a template, draw a circle in the center. The plate diameters I recommend are:

Little girl (6m - 3y) - 8"-9" salad plate
Big girl (4 - 8) - 10" -11" dinner plate
Dolly (15" - 18") - 5.5" - 6" saucer or bowl

If you don't have plates this size, search your household for other circular objects to trace.


Pin the layers together. Make a slit in the center of the squares, and carefully cut through both layers at the circular marking.

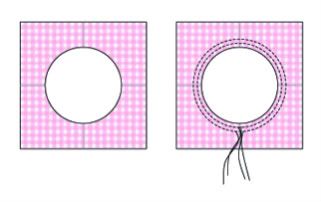
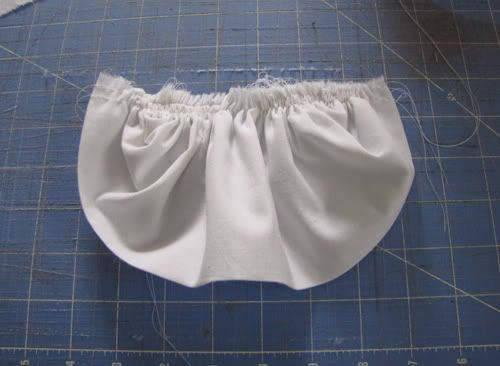
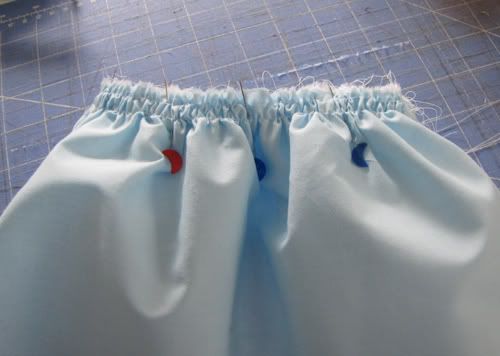
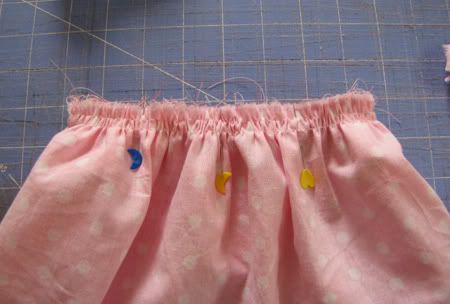
Turn the square right side out and press the seams. Run two rows of basting stitches around the circular edges.


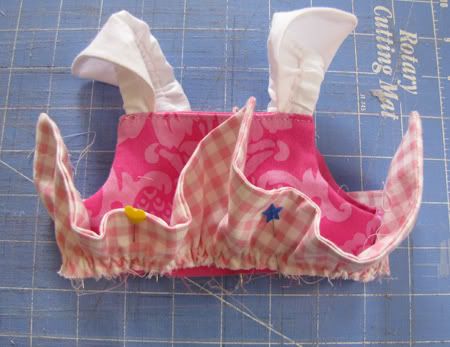
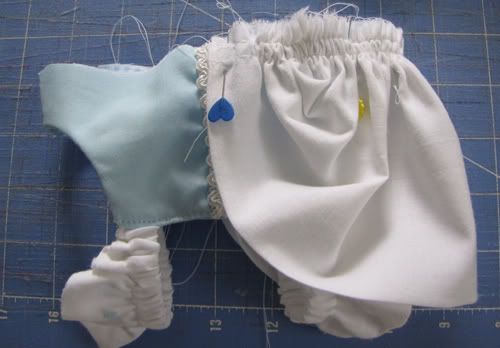
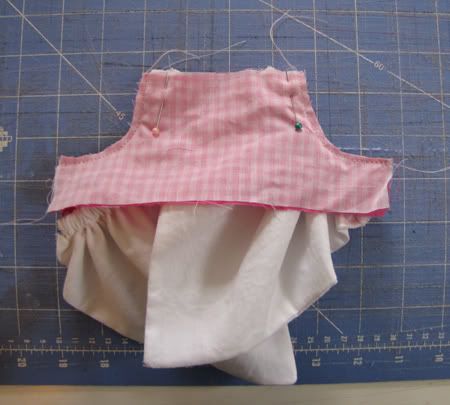
Pull the bobbin threads to gather the circle and align the raw edges of the peplum with the bottom edges of the bodice. Arrange the gathering so that the points are sticking up at the sides and the centers of the front and back.


Zig-zag stitch over the edges to "set" the gathers in place.


Remove the pins and gathering threads.


Add the skirt as described on page 51.


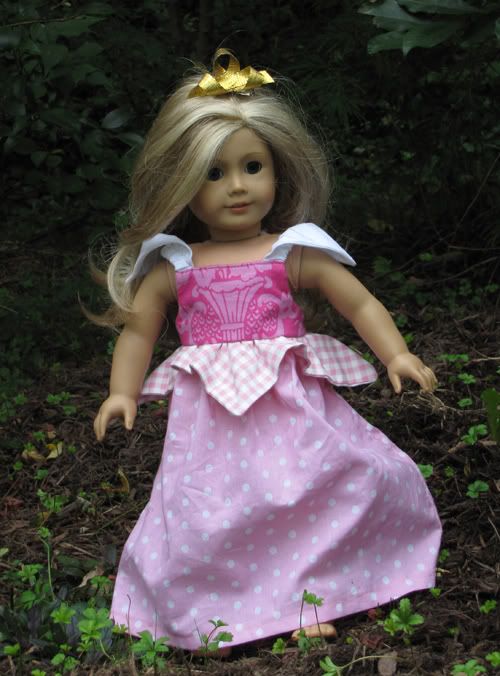
This makes for a light, comfy princess dress. For added warmth, the dress can be worn over a pink leotard.

OK, which princess do you want next???

Tuesday, September 15, 2009

Winner, winner, time for dinner!

Thanks so much to everyone for entering the "Blue Ribbon Twirl Skirt" giveaway. I thoroughly enjoyed reading all of the interesting (and often quirky) facts about states here in the U.S. and lands abroad. I just went through them again and noticed that many mention food - now I'm hungry! I used random.org to generate the winning post #...44!


The winning poster is Mickey, mama to NINE!!! I actually had the pleasure of meeting this very talented (and patient) gal at Jennifer's Sis Boom workshop last spring (there is another one coming up, by the way)! Her post sounded particularly delicious!

You KNOW I love your skirt! (and the fabric choice ;) I live in Oklahoma. You might not know this, but the Sooner State actually has an official meal. Whether it's popular or not I have no idea, but the State Legislature gave legal status to the dish in 1988. So here goes: Fried okra, squash, cornbread, barbecue pork, biscuits, sausage and gravy, grits, corn, strawberries, chicken-fried steak, pecan pie and black-eyed peas. I have no idea in what order one should eat this meal, but it certainly sounds like a lot of food. One reason the meal is so big is that Oklahoma grows/raises all of the items on the menu. I am so inspired by your ribbons and post that I am planning to enter next year, to our county & State fair! Even better, is that my 10 yr. old twins saw your post and are planning to enter the projects they are working on as well. I think it's awesome to be such a great mentor!

And now for the three winners of the Embellished Patchwork Twirl Skirt eBook, all with funny food and beverage related comments...

TheFancyFritter
Louisiana is probably the only state where you will find people that get so excited and even salivate over eating the yummy red, clawed, curled tailed bugs! CRAWFISH!! Yum! You're missing out if you've never tried them! :) I would love to win your giveaway! The skirt is BEAUTIFUL & I just love Sis Boom fabrics! Thanks so much! :)

badlandsquilts
I grew up in North Dakota...while I'm not sure if it is still a law (it was while I was putting myself thru college as a waitress)... when polls were open for elections bars were always closed - so voters would surely have a clear head! I grew up in the least populous county (Slope)where the county seat has a population of 29 (Amidon)... there is only 640K people in the whole state! Life in the VAST lane!


Benita
Our Texas State Fair is just gearing up to start and the food item that just took first place is.....deep fried butter. Seriously! How fast can you clog an artery with that!

If you are one of the owners of the delectable comments above, please email me at info(at)scientificseamstress.com so I can get your prize to you!

I've got another great giveaway to tell you about today! Boutique Cafe is celebrating its 5th Birthday, and they are offering up an INCREDIBLE prize pack (and there is a little something from me in there ;) )!


Go over to the Boutique Cafe blog to listen to the latest podcast, wish them a happy birthday, and get in the running for all of the goodies!

Tuesday, September 8, 2009

Blue Ribbon Twirl Skirt (Giveaway)!

Last year, we attended the Maryland State Fair for the first time. We had only been in town a few weeks, so it was really great to go and learn about all the animals, vegetables, and fruits that are grown right here in the state. What I found most exciting was the Home Arts building, which was full of cakes, photography, woodworking and SEWING! This year, I decided to get in on the fun and it was an absolute blast! I met some really great people, got very useful feedback on my sewing, and won some ribbons!!! The creation I am most proud of is this blue-ribbon winning Embellished Patchwork Skirt, and I'm giving it away to one lucky reader!


Now, I haven't gotten a ribbon for anything since 11th grade Science Fair (and I think that was 4th place), so my hopes weren't too high going into the competition. I'm happy to say I got ribbons on everything I entered, and I got a special award for Best Applique (pics to come)!


I would highly recommend participating in your own State Fair. It is so nice to be a part of such a wonderful tradition and have your work displayed among other fantastic creations. And I'm not sure how it works in other states, but here in MD there is prize money involved - woo-hoo! My winnings were more than enough to cover a day full of rides, games, and yummy junk food!


OK, so here is more info on the Twirl Skirt that is up for grabs...it is made entirely from wonderful Sis Boom fabrics (no two patches are alike)! I used my Embellished Patchwork Twirl Skirt eBook and included all of the trimmings - rick rack, euro ruffles, and inset ruffles.


I was inspired by a skirt that my friend Mindy made for her adorable little daughter. You can see her creation here in our Flickr group. This skirt is 13" long, and would best fit sizes 2-6 (I'll adjust the waistband elastic to the winner's specifications).


So how do you win this for your little twirler? Easy...just leave me a comment with an interesting fact about your home state. I'll pick a number at random for the skirt giveaway. In the spirit of the state fair, I'm going to throw a little friendly competition into the mix. The posters of the top 3 most amusing comments (as judged by me, myself, and I) will each win a copy of the Embellished Patchwork Twirl Skirt eBook. The winners will be announced on 9/15.

Monday, September 7, 2009

Simply Sweet Storytime

Once upon a time, there was a humble little pattern named Simply Sweet. This pattern was very practical in that it didn't require much fabric and made for a comfortable, wearable style. It was very easy to put together, too - no pesky buttonholes or zippers. As the name suggested, it was just simple, sweet, and cute. One day, a group of creative elves called the Disboutiquers got a hold of this little pattern, and an amazing transformation happened...Simply Sweet became a PRINCESS!!!

I have had lots of requests for princess patterns, but I feel like I already have them out there. I have seen so many regal, yet comfortable and sturdy princess costumes made from my patterns. If you check out our Flickr group, you will find lots of examples of practical princesses (and perhaps even a prince or two). By using creative fabric choices, fun embellishments, and a few modifications here and there, you can create the ballgown of your princess' dreams (then she can wear it in the mud and you can throw it in the wash). Over the next few weeks, I'm going to give a few simple tutorials on "princessifying" some of my existing patterns. Since my son is not a very cooperative model for these types of styles, I'll make the dresses dolly-sized.


I'll start out with Simply Sweet Cinderella. There are lots of variations on the classic Cinderella dress, both in terms of color combo and design. The main element that makes the dress is a peplum (at least I think that is what it is called) that attaches to the bodice and drapes across the sides ofthe dress. I'm sure there are lots of ways to add this detail, but I'm going to describe one that has lots of "poof," but doesn't require any extra patterns, calculations, or fluffy stuff.


For this dress, I am using the jumper bodice (empire length option) with ruffled straps. Cut the pattern pieces as described. Using the charts provided, determine the dimensions necessary to make a skirt that is calf to ankle length. Cut the 2 skirt pieces as described. In addition, cut 2 pieces (same size as the first 2) from the peplum fabric.


Cindy's bodice is pretty simple...in most pictures it looks like there is a seam in the center. If you want to jazz it up a bit, you can add some pretty trim or ribbon to the center line. The bodice is also a great place to add machine embroidery. My friend HeatherSue has some designs that are absolutely perfect for this particular princess.


Assemble the bodice as described in the eBook. Make the hemmed skirt as described as on page 45.


The diagram above shows how to make the peplum pieces from the remaining rectangles. It is very easy - fold the pieces in half lengthwise, right sides facing outward. Run two rows of basting stitches along the raw edges. If you are new to sewing, don't worry - the basting process is described in detail in the eBook.


Pull the bobbin threads to gather.


Align the ends of the peplum piece with the midpoints of the front and back bodice pieces. Evenly distribute the gathers.


Zig-zag stitch over the edges to "set" the gathers in place.


Repeat with the other peplum piece.


Add the skirt as described on page 51.


Remove basting stitches, and turn right side out. The peplum pieces will naturally puff out to the sides of the dress. I usually topstitch at this point to help the skirt hang properly and add interest to the waistline. In this case, I omitted topstitching because the peplum adds a lot to the waistline (both in terms of interest and thickness). If you do decide to topstitch, make sure to use a heavy duty needle.

I had a "ball" dressing up dolly!
Please let me know if you have any requests for the next royal star :) !