
I've gotten so much great feedback on the printable folding templates that I include with most of my e-patterns. They are just little cardstock guides, but they are really great for making accurate folds. I've gotten to the point where I use them with almost every project, and if I don't have one that has the fold I need, I'll draw an extra line (or I'll try to eyeball it, which I'm not so good at - ack).
Anyway, I thought it would be nice to have some universal folding templates with multiple lines. I've put together a pdf "e-booklet" that you can download here. It includes a straight template and a curved template, each marked with multiple lines at 0.25" increments. The instructions are included with the file, but I will go ahead and post them here as well:
Anyway, I thought it would be nice to have some universal folding templates with multiple lines. I've put together a pdf "e-booklet" that you can download here. It includes a straight template and a curved template, each marked with multiple lines at 0.25" increments. The instructions are included with the file, but I will go ahead and post them here as well:
Folding Templates
Templates are great tools for making accurate folds. Print the templates on regular cardstock and cut them out along the dashed lines. Important note: The folding template is designed to be printed at 100%. Before printing, make sure that page scaling is set to none in Adobe Acrobat print window. To be sure the template printed at the correct size, measure the box. It should measure exactly 1 inch by 1 inch.
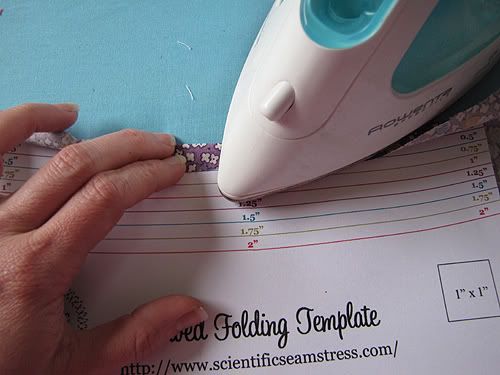
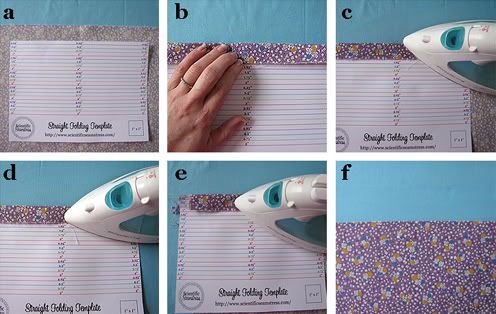
For a straight fold, place the numbered edge of the Straight Folding Template near the edge of the fabric to be folded (a). Starting in the center, bring the fabric over so that the edge meets the desired fold line on the template (b). Press, working the edge down to the line (c).
Slide the template over to one end of the fabric piece and press (d).
Repeat at the other end (e). Flip the fabric over and press the length of the fold (f).
Templates are great tools for making accurate folds. Print the templates on regular cardstock and cut them out along the dashed lines. Important note: The folding template is designed to be printed at 100%. Before printing, make sure that page scaling is set to none in Adobe Acrobat print window. To be sure the template printed at the correct size, measure the box. It should measure exactly 1 inch by 1 inch.
For a straight fold, place the numbered edge of the Straight Folding Template near the edge of the fabric to be folded (a). Starting in the center, bring the fabric over so that the edge meets the desired fold line on the template (b). Press, working the edge down to the line (c).
Slide the template over to one end of the fabric piece and press (d).
Repeat at the other end (e). Flip the fabric over and press the length of the fold (f).
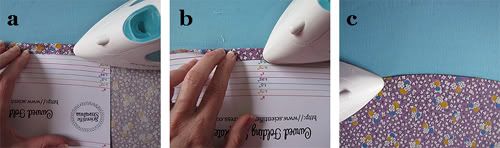
The procedure for using the Curved Folding Template is very similar to that of the Straight Folding Template.
For a convex (hill-shaped) fold, place the convex edge of the Curved Folding Template near the edge of the fabric to be folded. Starting in the center, bring the fabric over so that the edge meets the desired fold line on the template. Press, working the edge down to the line (a). Slide the template along the edge and continue to press, wiggling the template as needed (b). Note: for wider folds, small pleats may be worked into the edges to accommodate any excess width at the edges. Flip the fabric over and press the length of the fold (c).
For a convex (hill-shaped) fold, place the convex edge of the Curved Folding Template near the edge of the fabric to be folded. Starting in the center, bring the fabric over so that the edge meets the desired fold line on the template. Press, working the edge down to the line (a). Slide the template along the edge and continue to press, wiggling the template as needed (b). Note: for wider folds, small pleats may be worked into the edges to accommodate any excess width at the edges. Flip the fabric over and press the length of the fold (c).
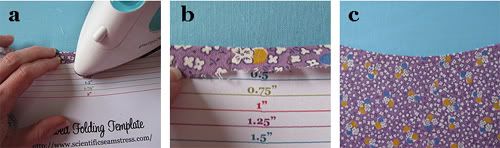
For a concave (valley-shaped) fold, place the concave edge of the Curved Folding Template near the edge of the fabric to be folded. Starting in the center, bring the fabric over so that the edge meets the desired fold line on the template. Press, working the edge down to the line (a). Slide the template along the edge and continue to press, wiggling the template as needed. Note: for wider folds, snips may be made to allow the edges spread out (b). Flip the fabric over and press the length of the fold (c).
Here is the download link again: Folding Templates - Happy Folding!!!
Great idea. Thanks for sharing!
ReplyDeleteI wonder how I ever lived with out these! It's why I first fell in love with you....er, your designs!
ReplyDeletefolding templates are my fave. I knew you were a genious the first time I used them! Thanks Carla. the universal template is just PERFECT!
ReplyDeleteThese are wonderful! Thanks for sharing them with us.
ReplyDeleteThis is awesome Carla! Thanks! Is there a template that will fold all of my laundry too?
ReplyDeleteTHANK YOU SO MUCH FOR SHARING!!!
ReplyDeleteI can't wait to download this a get it printed! What a great idea! Thank you!
ReplyDeleteThanks so much Carla - I just love these templates!
ReplyDeleteThanks so much for sharing!
ReplyDeleteYAY for free stuff!! You know I love me a free pdf LOL. And since I'm crap at folding this is AWESOME. If I need to hem something I usually just adjust the cutting so I can change to fold to match one of you're guides from a pattern LOL. Now I don't have to!
ReplyDeleteThanks! Such a great idea!
ReplyDeleteThank you so much! This is a wonderful help!
ReplyDeleteFabulous! Thanks very much.
ReplyDeleteWhat a great idea! Thank you so much - I know I will use this over and over!!
ReplyDeleteThank you x infinity!!!!!!!!!!
ReplyDeleteSimply amazing!!! So simple yet so useful and effective! THANK YOU SO MUCH!!!!!!!!!! (from Spain)
ReplyDeleteWhoa... I think you just rocked my world. This is fabulous! I would love to link to your templates if you didn't mind.
ReplyDeleteVery interesting...October 01, 2009
ReplyDeletehttp://twowildflowers.typepad.com/two_wildflowers/2009/10/kathys-easy-peesy-iron-up-hem-guide.html
This looks really useful. Thanks for sharing. Though having problems with the download. Will try when I'm on my home PC.
ReplyDeleteWhat a really simple but super idea. It's one of those ideas that makes you think "why didn't I think of that - duh". Thanks!
ReplyDeleteGENIUS! Thanks so much! I'm here via Crap I've Made and am a new follower!
ReplyDeleteThis might be the most brilliant sewing tool I've seen!! Thank you so much!
ReplyDeleteMiss Carla--the folding templates are wonderful. When I first made the Molly dress, I was like, "Folding template? Bah! I've been folding for years without a template!"
ReplyDeleteFive minutes into working on the bodice pressing, I was printing out the template! I learned my lesson!
Thanks for sharing your wonderfulness with us!
I'm always using these now when I'm sewing they are brilliant! So much in fact that when I take photos of doing seams I always comment on where I got these from.
ReplyDeleteMany thanks for making life easier.
I've always used a hem gauge but this might work better. I'll give it a try. thanks, Kitty
ReplyDeleteWhat a fabulous idea and THANKS SO MUCH for sharing it with us!!!
ReplyDeleteCan't thank you enough for making this available! You're the best :D
ReplyDeleteThank you so much, it works like a charm. I am from the Netherlands and everyting is in cm and with this inch template I don't have to calculate anymore and I also use it to set my sewingmachine in the right position for the seam allowance.
ReplyDeleteThank you for sharing! Sometimes it's the simplest of things that make life easier!
ReplyDeleteJust found this post through pintrest! Awesome thanks for sharing!!!
ReplyDeleteThis is awesome! I have the metal one and stopped using it because I kept burning my hands on it!
ReplyDeleteThis is great! I have an older metal one that I use (and love), but the sheer portability and ease of the paper template=awesome.
ReplyDelete<3!
Thank you for these! What a great tool!
ReplyDeleteThank you, Thank you, Thank you!!! I wish I would have had this a couple of hours ago...
ReplyDeleteThank you, Thank you, Thank you!!! I wish I would have had this a couple of hours ago.
ReplyDeleteThank you for sharing, these look like they took alot of time to create.
ReplyDeleteThank you!!!!! I've made my own templates before but I have them all separate. I never thought of making one master, and now I don't have to!
ReplyDeleteI have no cardstock, but need this desperately! My solution? I printed on regular paper and glued it to a file folder and trimmed.
ReplyDeleteThanks so much for being so generous!
I never would have thought of this - it makes the task SO much easier! Thanks a bunch for the free download!
ReplyDeletei am wondering what kind of things you all are using folding for.
ReplyDeleteThanks for the free template. Now I can throw away my metal Dritz EZY-hem ruler that burned my fingers!
ReplyDeleteCool! Thanks so much!
ReplyDeleteThis is such a great idea! I am having trouble downloading it though? I tried on two computers, and it does nothing.
ReplyDeleteWow! Thanks! I have a folding template from ages ago that I drew myself on cardstock. It's nice to have one I can print out and looks nicer!
ReplyDeleteFantastic! Where has this been all my life?! Thank you.
ReplyDeleteAwesome! Can't wait to try this! Thank you so much!
ReplyDeletegreat idea thanks :)
ReplyDeleteThanks so much this will come in handy!
ReplyDeleteHahaha, I use a piece of graph paper the same way!
ReplyDeletePS OpeID doesn't work for non-blogger users on your blog. Can you install disqus or something similar so we can comment easily (without having to put in all our details/ sign up for Google) please?
I found this on pinterest and now use it all the time! Thank you so much! This beginner sewer really appreciates it!!!
ReplyDeleteMany thanks ! I try it yesterday and it works wonderfully.
ReplyDeleteI love this idea!! Thank you so much!
ReplyDeleteOh my gosh. This is wonderful. I have linked to you on my blog.
ReplyDeleteWow awesome!They're beautiful. You do such a great job. I love your work style keep it up..
ReplyDeleteWhat an awesome gadget.
ReplyDeleteThank you for sharing! Genius!
ReplyDeleteI just found this on Pinterest thank you so much!!
ReplyDeleteI was making curtains last night and remembered that I had added this to my Pinterest list. YEAH!!! It was just what I needed. Thanks for the great template!
ReplyDeletePure Genius! I just shared this as my Sewing tip of the week.
ReplyDeletehttp://sugartartcrafts.blogspot.com/2013/02/tip-of-week-folding-template.html#
this is genius!!!!
ReplyDeleteThanks for this I tried to make one my self but it didn't work.
ReplyDeleteMany thanks for sharing.
ReplyDeleteWarmest greetings from Germany,
Nora :-))
Great idea! Thanks so much for sharing.
ReplyDeleteAmazing trick! Thanks for sharing!
ReplyDeleteMy post-doc studies were on molecular biology and biochemistry so I am thrilled to have found your blog!
Here is mine
akamatras.blogspot.com
xo
Thanks a lot.
ReplyDeletethank you! thank you! thank you!
ReplyDeleteThank you so much for these! I have been using them for years and just posted you to my Sew Essential series as Tip #1! (http://threadridinghood.com/wordpress/sew-essential-tips-tricks-and-notions-1-fold-like-a-pro-a-giveaway/) ~Sherri (sherri@threadridinghood.com)
ReplyDeleteYou are so generous, and, clever! I cannot say thank you enough.
ReplyDeleteThank you so much for sharing these!
ReplyDeleteWow! This should make my life so much easier, thank you!
ReplyDeleteThis is so simple, like all great ideas! Many thanks.....
ReplyDeleteThanks so much for the printables! I love this. It will help me so much!
ReplyDeleteThis is great! Thank you
ReplyDeleteI bought a metal one of these on a trip to America a few years ago and I really love it. It's not something that you can easily find here in the UK so I point all of my students in your direction so that they can print out their own. Thanks, they all appreciate it :-)
ReplyDeleteI am a science teacher who also sews. thank you these were well thought out
ReplyDeleteThis is the best thing ever. I am sitting here kicking myself in the butt wondering why I didn't just think of this. Good thing one of us was on it! Thanks!
ReplyDeleteThank you so much for the straight and curved pressing templates as well as that darling periodic chart. Very good to have and so clever.
ReplyDeleteThank you for these templates. They will be very useful.
ReplyDeleteThank you for posting these folding charts. Printed them on card stock . going to try them out today on my cafe curtains. So clever. Thank you for sharing
ReplyDeleteThank you so much for sharing these templates. I have just downloaded them and I am sure they are going to prove very useful! I could have used something like this for years! So clever, and yet so simple.
ReplyDeleteShoshi
This looks pretty cool! Plus it can serve as a nice fan in a pinch. W Carrier
ReplyDelete