Showing posts with label YCMT. Show all posts

Sunday, December 21, 2008

The final push!

I mailed out 10 packages yesterday, which is definitely a post office record for me. Included in those boxes: 3 tote bags, 2 aprons, 3 bowling shirts, 4 dollies, 1 pair of pajama pants, 2 name pillows, and 5 loaves of bread (Del's contribution). Almost everything was made during the Thrifty Under Fifty Challenge, and I came in well under budget (I think my total was something like $7). I think I've already posted about everything but the name pillows and the pj's, so here they are:

Photobucket


Photobucket

They are gifts for Del's niece and nephew (who is also a Delmar). The fun pillows are made from the Kimberbell Kids Personalized Name Pillow eBook from YCMT. I used the machine embroidery version from SWAK embroidery. The pants are Easy Fits (of course).

I have about 2.5 days left to make two pair of grown-up sized jammie bottoms, a quilted bed runner, a few photo/decoupage projects, and lots of little embroidery projects. I'm pretty sure I will be able to finish it all, but it is definitely feeling like "crunch time."

So what is everyone else up to...are you still crafting/sewing??? If so, what are you making? Post a comment (hopefully letting me know that I am NOT alone in my last minute frenzy), and you will be entered to win a CarlaC eBook of your choice! I'll do the drawing Tuesday (12/23) p.m. Hopefully by that point I will be finished up and wrapping presents!


Thursday, December 18, 2008

Strap happy

Photobucket

I made tote bags for two of Del's fabulous bosses and a very helpful administrative assistant. I wanted the bags to be practical, yet chic. I had no trouble choosing the pattern - the Aivilo Pocket Handbag is as functional and stylish as they come. Fabric selection, however, gave me fits. I've been very good about using my stash for giftmaking, but I really didn't have anything suitable for these recipients (polka dots and cutesy prints just weren't going to cut it). Since the "Thrifty Under Fifty" challenge ended on the 15th, I lifted my spending freeze and made a trip to Super JoAnn's. Del and Lou were with me (actually, they were in the neighboring Home Depot, thank goodness), so I didn't have all that much time to shop.

I wandered around, finding lots of fabrics that would be great for other projects, but nothing for the bags. It was getting close to our lunchtime, and I knew Lou was going to pull the heart-wrenching "I'm HOOOONGRY" routine on his dad. In the interest of time, I narrowed my search to the Legacy Studio quilting prints. These fabrics are in line with what you find in a high-end quilt shop (both in terms of quality and price). They are normally $8.99 /yard, but were on sale for $6.29/yard - yippee! I decided to go with the cool-colored, gold-touched Asian prints. There were six different ones, so I figured I would just get them all and use 2 for each bag.

When I got home, I played with the pairings a bit, but wasn't all that inspired. I put the fabric aside, hoping that I would have a more creative brain on a non-shopping day. Nope - even well-rested, I couldn't come up with three winning combos. The problem was that the collection looked so great all together. I thought about doing a patchwork thing using ALL the prints in ALL the bags, but decided that it would look too busy. Plus, some of the bigger motifs would be lost. I came to a compromise and went with three prints for each tote - 2 for the pockets, and 1 for the main bag.

Feeling proud of myself for finally coming up with a solution, I got out the rotary cutter and cut out my pieces. All went well (meaning no mislicks or blood) until I came to the strap. Because of my little modification, I didn't have enough length - WAH! There was no way that I was going back to the fabric store, so I decided the only solution was to piece the straps.

Photobucket

After stitching my pieces together, I started to worry about durability. Even though I had used good thread and small stitches, I was concerned that a full tote would put too much strain on the seams. And no matter how good looking the fabric combo, a busted strap would be an ugly thing (and could result in the boss having bruised apples or blemished books - ack)! I had to come up with a reinforcement.

Interfacing was a possibility, but all the stuff I have on hand is pretty flimsy. I also considered cutting strips of canvas, but I was really sick of using the rotary cutter at that point. I had a little webbing, but not enough for three bags. In the same snakepit of a drawer, however, I found the perfect solution- grosgrain ribbon!
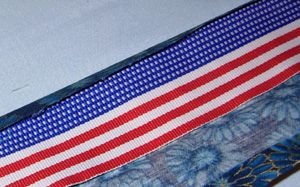
Photobucket

Ok, I know it doesn't match, but it is the perfect width, very strong, and I have miles of it (post-Independence Day clearance). I noticed with the first strap that the fit was a bit tight in spots where I didn't do a perfect job with the folding. So for the remaining straps, I used a little tool to improve my accuracy.
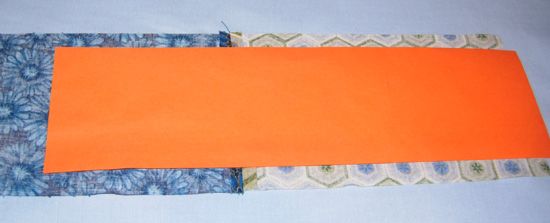
Photobucket

I cut a piece of cardstock that was just a bit larger than twice the width of the ribbon, and used it as a folding template.


Photobucket

I folded the edges over snugly and pressed (the iron is disgusting at this point, so no action shots).
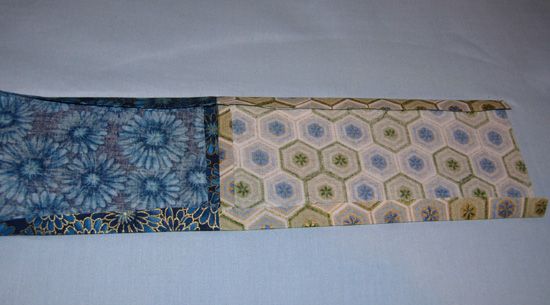

Photobucket

After pressing the edges, I folded the straps in half lengthwise and pressed again.
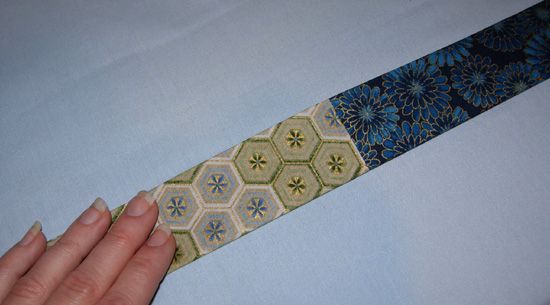
Photobucket

I then unfolded the straps and tucked the ribbons inside.
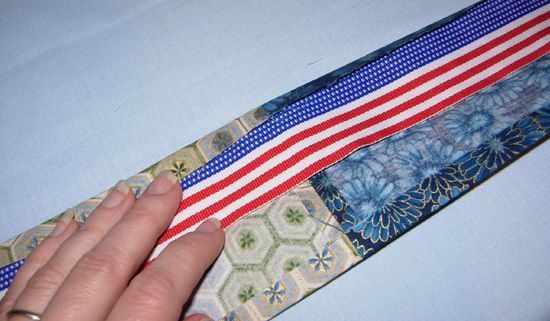

Photobucket

I refolded the strap and stitched. I'm pretty happy with the finished products. The straps have a nice, substantial feel to them. I think the ribbons will provide the support needed to mitigate mechanical failure of the seams, but if not, at least the apples/books will be saved, and the boss will get a patriotic surprise!
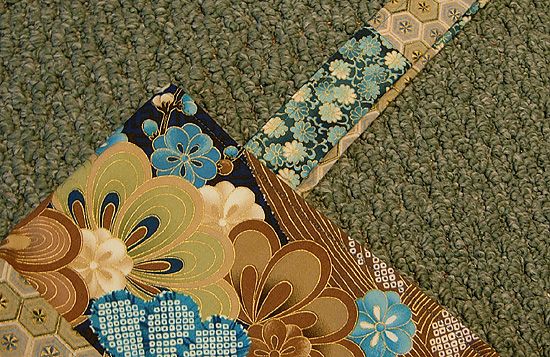
Photobucket

Wednesday, December 17, 2008

Hello Dolly!

Photobucket

A few weeks ago, Kimberbell Kids Dolls made their debut on YouCanMakeThis.com. I had the pleasure of helping Kim, the owner of YCMT, bring them to life in eBook form. These cuties are based on Kim's wonderful applique designs. Our objective was to take her 2D drawings and turn them into huggable 3D friends. We spent many hours brainstorming about size, structure, materials, etc. Many "interesting" prototypes were made. In fact, right around Halloween, dozens of limbs were strewn about my dining room. It felt like "Nightmare on Sesame Street" - LOL!!! Anyway, after extensive research, development, and testing we arrived at Dolly's final form.

Photobucket

Dolly is a cuddly 24" tall, and is crafted from materials that are inexpensive and easy to come by. She is amazingly FUN and EASY to make, too. I love trying out different hairstyles and outfits! In fact, I spent the past few days making dolls to give to some special little girls in my life. Since Kim and I have lots of outfits and accessories planned for 2009, I decided to do a little R&D while I was at it :) .

Photobucket

Meet Jenna, the cheerleader. She is an adorable little redhead who is full of energy and spunk. She comes from a long line of LSU fans. Geaux Tigers!!!


Photobucket

Meet Emily, the baker. Her dad is a chef, so she really knows her way around the kitchen. This girl is as sweet as cherry pie!

Photobucket

And last but not least, meet Marissa, the girl in Paris. She loves shopping with her brother, mom, and grandma. Doesn't she look fabulous in purple?

Can you tell I'm having too much fun with these dollies??? I still have huge list of gifts to make, though, so I need to put away the stuffing, yarn, and felt for now. My focus for the rest of this week is going to be finishing the gifts that need to be mailed. The goal is to make a big post office run on Saturday morning. I will then spend the remaining days before Christmas making gifts to put under the tree for my nearest and dearest :) .

Sunday, December 14, 2008

Reversible Cuffed Pants Tutorial

Photobucket - Video and Image Hosting

Reversible pants are really easy to make. Basically, you make 2 pairs of pants, sew the waist edges together, flip everything right side out, and finish off the leg openings. Of course, that last finishing step can make or break the entire garment. The pants pieces have to be perfectly aligned to get nice stitching on both sides. I've been making reversible pants ever since Lou was a baby, and have been optimizing my "protocol" along the way.

Pattern modification

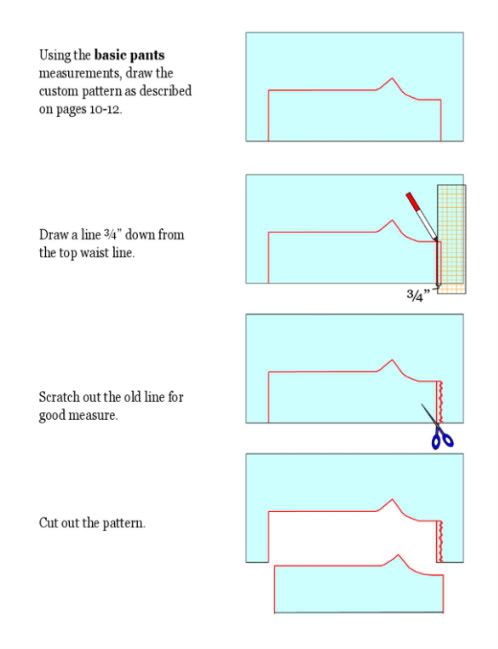
If you are using my Easy-Fit Pants pattern, very little modification is needed. To calculate the length needed to make pants with a 3" cuff, plug the current outseam measurement into the basic pants formula.

Draw the pattern as the instructed, then take 3/4" off the top. You are ready to go!

Figure 1: Easy-Fit pattern modification
Photobucket - Video and Image Hosting

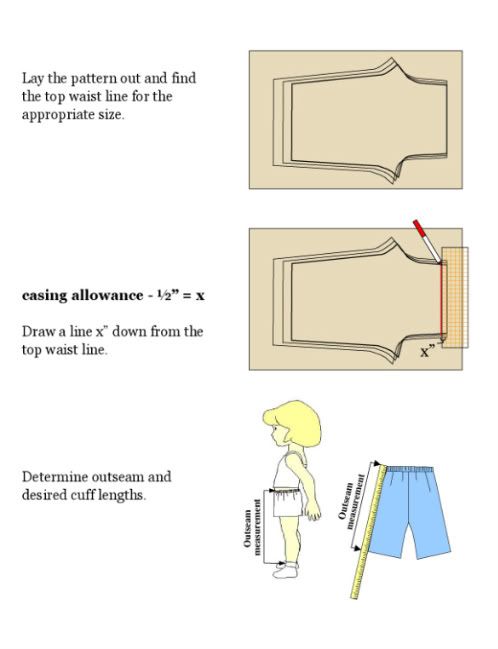
If you are using a commercial pattern, you will need to shorten the casing and and lengthen the legs. In the illustration, I show a 1 piece pants pattern (meaning no side seam), but you could make the same modifications to both pieces of a two piece pattern.

The top cutting line should be a half inch above the original top of the finished waistband. Some patterns have the waistband position or the casing allowance marked right on the pattern. If not, look at the instructions to determine the casing allowance. It will probably be between 1 and 1 and 1/2", depending on how the wide the casing is and how it is finished. Since the elastic will be inserted between the two layers of pants, you will cut off all but 1/2" of the casing.

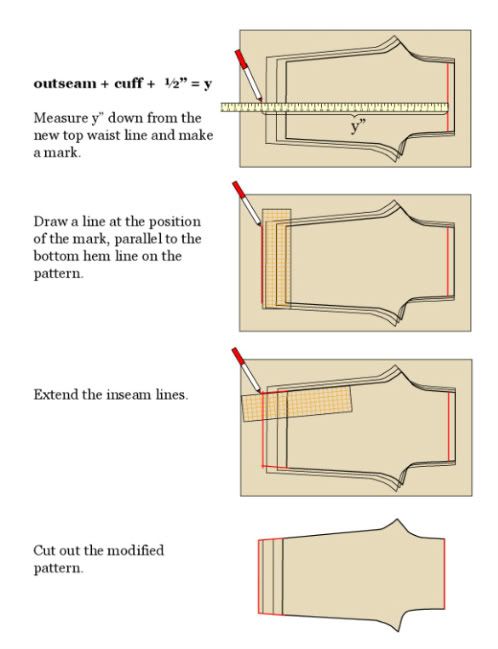
Once you know where the top of the pants will be, you can calculate how long to make them. Determine the current outseam by measuring the recipient or a pair of pants that fit them right now (I'd much rather measure clothes than wiggly children). Add in the desired cuff length (I usually go with 3") and 1/2" to account for the top allowance.

Figure 2a: Paper pattern modification
Photobucket - Video and Image Hosting

Figure 2b: Paper pattern modification (continued)

Photobucket - Video and Image Hosting

Cutting

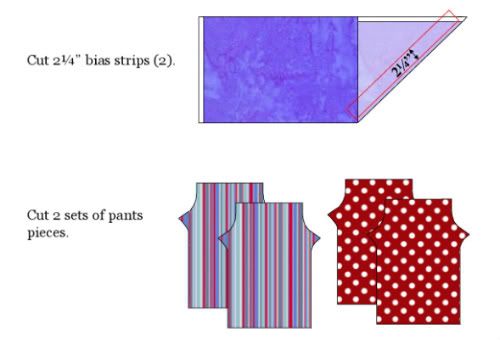
You will need 2 bias-cut strips that are 2 and 1/4" wide. I make my strips by folding a half yard of fabric diagonally and cutting the strips very close to the fold. This gives strips that are about 25", which is ample for most sizes. If you are making a pair of very wide legged grown up pants, you may need to start with a larger cut of fabric. After you cut the strips, trim them so that they are slightly longer (about an inch) than the width of the bottom edge of the pants pieces.

Cut 2 sets of pants pieces using the modified pattern.

Figure 3: Cutting
Photobucket - Video and Image Hosting

Cuff Preparation

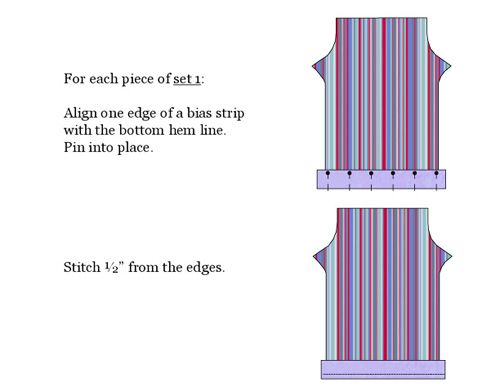
You will stitch the strips to one set of pants pieces, 1/2" from the edges. I'm usually a "minimal pinner," but in this case I recommend using plenty of pins to keep the bias strip from stretching and distorting.

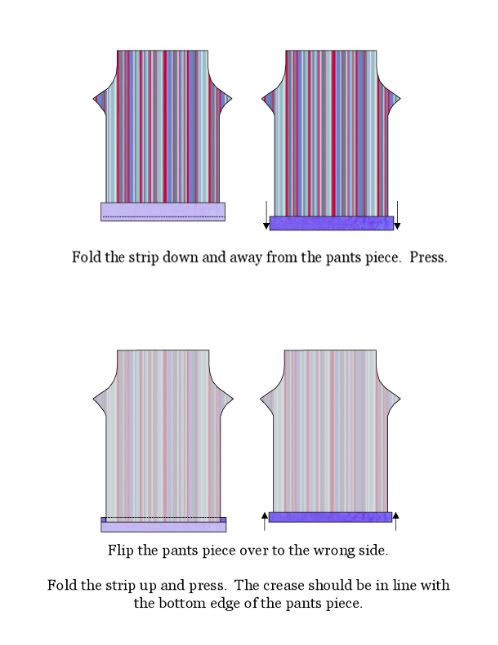
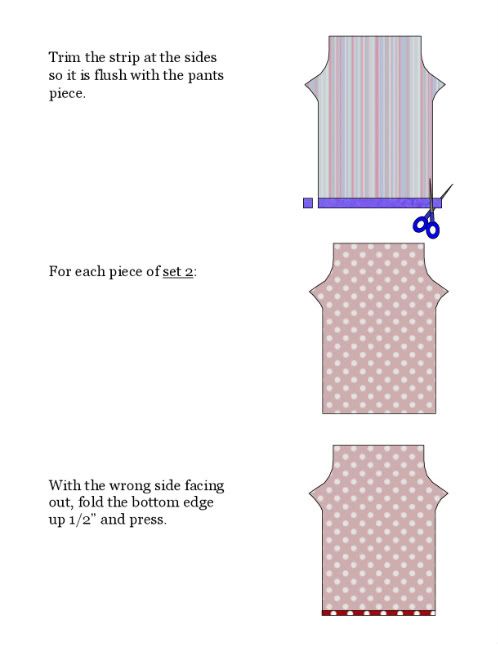
After stitching, the strips are pressed down and over the edge of the pants leg, and are then trimmed flush.

The bottom edges of other set of pants pieces are folded under 1/2". If you have the Easy Fit eBook, you can use your folding template here :) .


Figure 4: Pinning and stitching the bias strips
Photobucket - Video and Image Hosting


Figure 5: Pressing the bias strips
Photobucket - Video and Image Hosting

Figure 6: Trimming and pressing
Photobucket - Video and Image Hosting

Pants Assembly

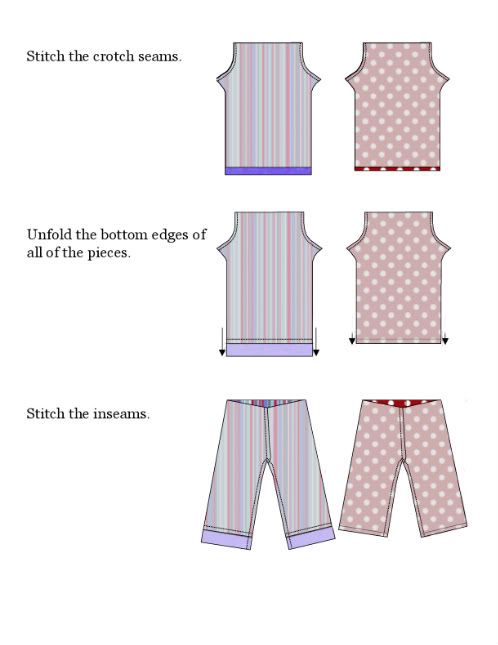
Sew the pants together as instructed. Unfold the leg openings before you stitch the inseam.

Since the edges will be incased, there is no need to edge finish (though you certainly can zig-zag or serge if are fanatical about those kinds of things). If you are working with a commercial pattern, trim the seam allowance down to 1/4" (you are already there with the Easy-Fits).

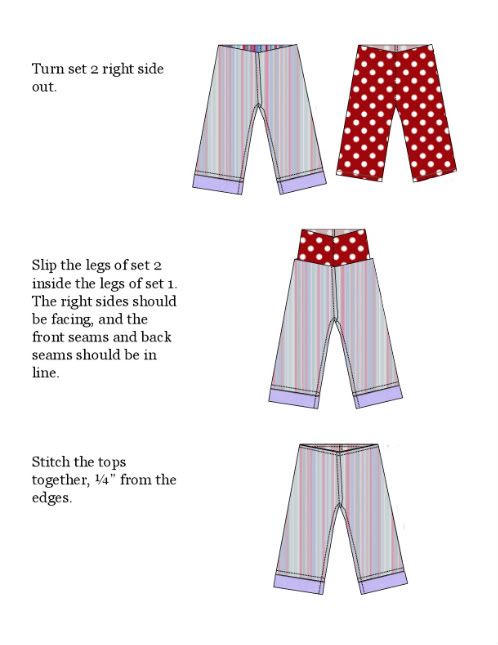
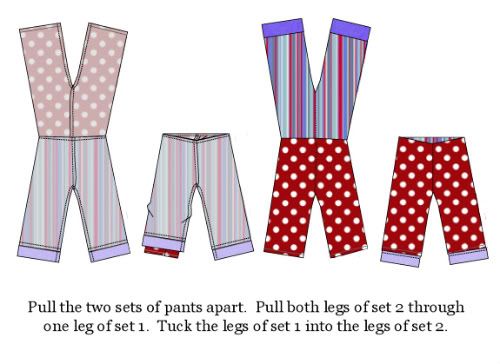
The two pairs of pants are then put together, right sides facing, and sewn together 1/4" from the top edges. The pants are then tucked, twisted, and turned so that the right sides are facing outward.

Figure 7: Sewing the pairs of pants
Photobucket - Video and Image Hosting

Figure 8: Putting the pairs of pants together
Photobucket - Video and Image Hosting

Figure 9: Turning the pants right side out
Photobucket - Video and Image Hosting

Casing

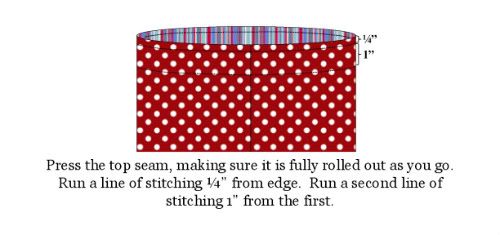
The casing is formed by running two lines of stitching, 0.25" and 1.25" from the top edge. Don't worry about leaving an opening for the elastic - we will make that later.

Figure 10: Stitching the casing

Photobucket - Video and Image Hosting

Finishing

I'm going to switch over to step-by-step photos to illustrate the all-important final steps for each pant leg .

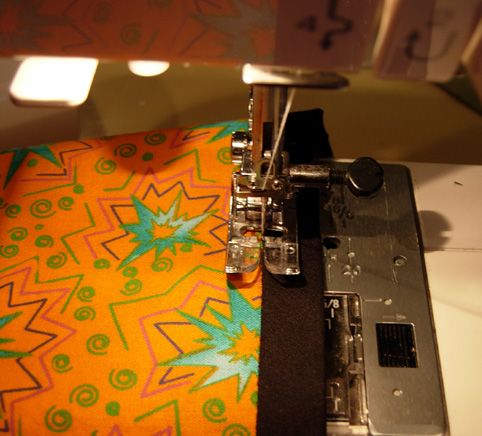
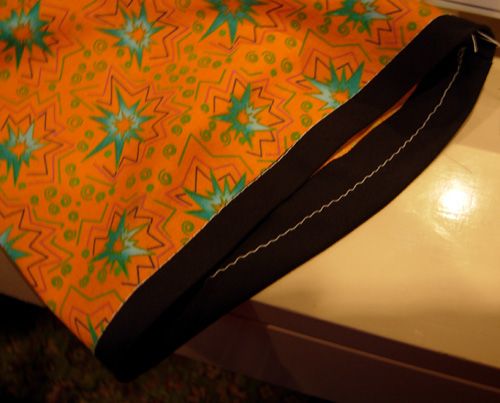
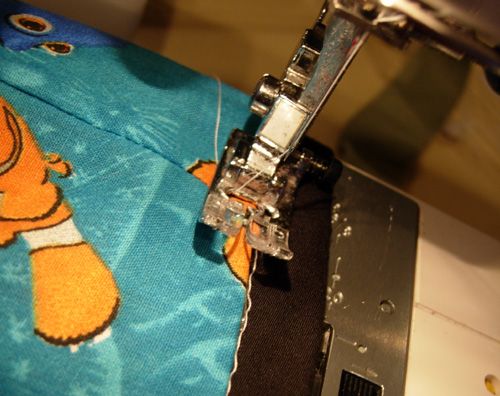
Refold the strip into place against the layer to which it is attached. Stitch right through the seam on the right side with a basting stitch (long stitches, low tension). Make sure the other pants layer is out of the way at this point.

Photobucket - Video and Image Hosting


This stitching serves two purposes - 1) it provides a perfect alignment reference for the other layer and 2) it keeps the strip perfectly positioned when the layers are stitched together.

Photobucket - Video and Image Hosting


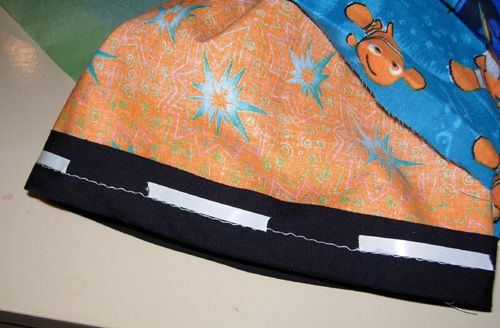
I use my all-time favorite notion, Wash-Away Wonder Tape for the next step. You can find it in at most fabric stores (at my JoAnn's, they hide it with the quilting supplies).

Stick pieces of Wonder Tape just above the stitching as shown in the photo (yes, I am stingy, but the small pieces are also easier to position).

Photobucket - Video and Image Hosting


Peel away the backing, and align the folded edge of the other layer with the basting stitch. Press with your fingers to get a good stick.

Photobucket - Video and Image Hosting


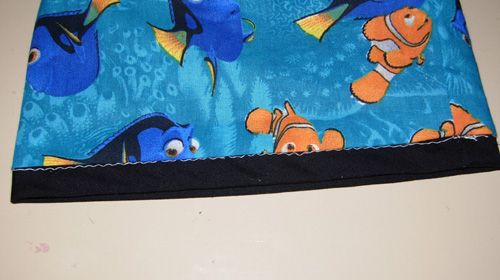
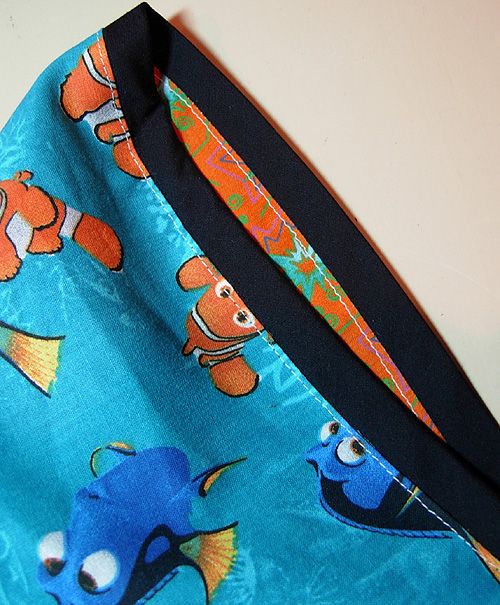
Stitch through all of the layers, 1/8" above the folded edge of the taped pants piece.

Photobucket - Video and Image Hosting


Remove the basting stiches. Voila - a perfect finish on both sides!

Photobucket - Video and Image Hosting


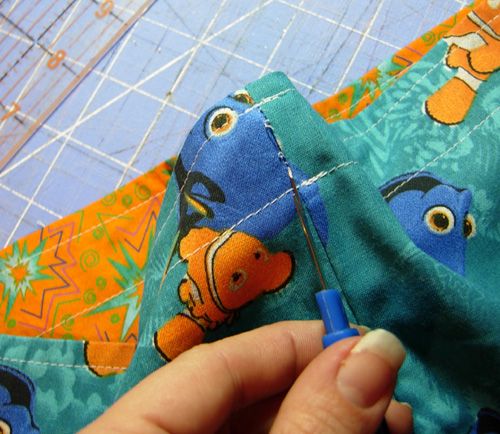
Of course, we aren't finished until we put in the elastic. Using a seam ripper (usually reserved for disasters, I know), pick out the back seam between the two lines of casing stitching.

Photobucket - Video and Image Hosting

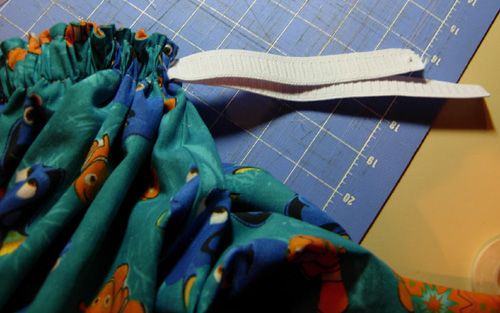
Insert the elastic into the resulting opening. Pull through, and stitch the ends together your favorite way.

Photobucket - Video and Image Hosting

Arrange the folds in the openings back into place, and stitch through all layers, very close to the folded edge.

Photobucket - Video and Image Hosting


And there you have it - reversible, cuffed pants that will grow with your child!


Friday, December 12, 2008

Fancy Pants

Here are some pants I made for Louie today. I'm going to applique a patch of the fishy fabric on a $2.50 t-shirt when it comes out of the dryer. Lou is a big Nemo fan, especially after our trip to the Baltimore Aquarium a few weeks ago. He actually enjoys getting new clothes, so I know these will be a hit.


I used my old standby Easy Fit Pants pattern, but made some modifications to make them REVERSIBLE! The technique involves taking a bit off the top, lengthening the bottom, and finishing off the cuffs in a most impeccable way. I'd be happy to publish a "tute" if anyone is interested :) . Anyways, I just love this style for rapidly growing kids. Louie always outgrows pants in length rather than girth. Since the cuffs are adjustable, I can get so much more life out of pants made this way. For example...

Here is my "sweet pea" - barely two and enjoying a cold, wet mud puddle in Cleveland.

Fast forward to age 3. He was a big hit at the 2007 Celebration of CT Farms. Now he is 4 and the pea pants are still in his drawer. They fit more like board shorts now, but I just can't bear to part with them!

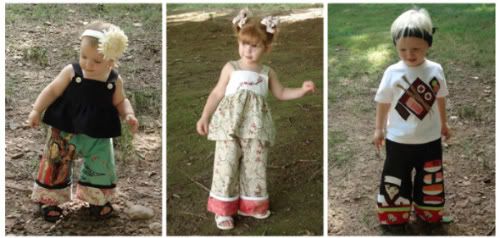
Using the same technique, I also made a pair of grown-up pants for a dear friend of ours. Her name is Julie Jordan, and she is an incredible vegetarian chef and cookbook author. I just adore her - she is so intelligent, funny, caring...I could just go on and on. Her food is unbelievable, too (ask anyone from Ithaca, NY about her "Wings of Life" salads).

I actually bought these fabrics about two years ago with her in mind. I wanted to make her a pair of snazzy chef pants that she could flip over and wear out on the town. I used the same one piece pattern (meaning no side seams) that I use to make Del's pajamas. I just added a few extra inches to account for the cuff and the fact that she is several inches taller than he is :) . That is another nice feature of reversible, cuffed pants - you don't need to have exact measurements to get a perfect fit!

Thursday, December 11, 2008

Bowl-O-Rama

I'm happy to say that my new eBook is listed on YCMT, and I'm back in the swing of making gifts! I used my Bowling Shirt Pattern to make these presents for some of my rowdy girlfriends. Actually, the shirts are for their kids, but hopefully they will bring back memories of all the crazy things we did back in the day. Things like...


...going out for sushi. We girls could put some hurt on a "boat!"


...gossiping around the chimnea on warm summer nights.


...planting flats and flats of peas so that we could isolate the chloroplasts from the seedlings. There is no better bonding experience than cleaning up the gooey green aftermath of that procedure!


This last one is for my Louie. One our former neighbors used to say he was a "card," so this fabric always makes me think of him.

There only FOUR days left of the "Thrifty Under Fifty" challenge, and I still have lots to do. I still need to make pajamas for Louie, pants/shirts for Louie, finish three dollies, two name pillows, a quilted runner, and some handbags. I'd better get to work!!!

Tuesday, December 9, 2008

In that mode...

I've been hyperfocused on my latest eBook for the last few days. I get into kind of a weird trance when I am at this phase in the process. All I can think about is finishing the eBook. Laundry is piling up, my hair is getting greasy, and Louie is disassembling things right and left. Thankfully, I have an understanding husband who is keeping us fed and withholding comment about my hair.

This "mode" is nothing new. I used to get myself in the same state back in my science days. It was especially bad when I would write grant proposals. I'd usually put off the boring paperwork until the dead last minute, and would end up in fighting with the departmental secratary's typewriter in the middle of the night. The lack of sleep would make me terribly emotional and completely antisocial. It was always such a good feeling to get the fat envelope sent off and grab a shower and a long nap.

My eBook writing zone is a much more blissful state. It is really a joy to write about sewing and crafting. Bodices and bows are so much more fun to draw than enzymatic pathways. Any deadlines are self-imposed, and it isn't the end of the world if I go ahead and go to bed when my eyes start to ache. In this case, I'm really pushing to get this eBook finished in time for holiday sewing projects.

Since I am sooooooo close to finished, I'll go ahead and disclose what I've been working on...


I've been wanting to make a vest pattern for the longest time. Louie wore a prototype to my brother's wedding last April (poor kid always cries at weddings).

I'm very excited about this eBook! Vests are hot right now! And they aren't just for dress-up, either! I love the look of an oversized vest over a big T-shirt - very retro 80's! I'm including options for collars, mock pockets, and ties/belts in the back.

These vests super-duper easy to make, too. They are definitely good for instant gratification! Speaking of which, the ties are made from this eBook by my friend Sherrie, aka PatchworKids. Talk about an easy, adorable project!

OK, back to putting the finishing touches on my eBook. I'm really looking forward to washing my hair tonight!

Friday, December 5, 2008

Treeful of Gifts

My mom has the nicest group of friends. They take such good care of each other, and are always going out to do fun things like lunch and shopping. When we visit, they go out of their way to drop by and see us, and bring little gifts and treats for Louie. I'm always wishing I had something special to give in return. I'm happy to say that this holiday season, I'll be able to show my appreciation for these great ladies with some handmade door-hangers.

This was such a fun, easy project!!! I downloaded the FREE instructions from YouCanMakeThis.com. It comes with a pattern and very detailed instructions for hand-stitching "Home for the Holidays" surrounded by dainty snowflakes. The design was created by my friend and favorite stitchery artist, Shelli. Also known as "Needle in a Haystack," she creates the most beautiful, whimsical, and meaningful samplers and motifs. For the longest time, I've wanted to sit in front of the fireplace and carefully stitch out one of her lovely designs. Alas, between child and work, I just don't seem to get that kind of quiet time. That is why I was beyond THRILLED when I found out Shelli was going to offer machine embroidery designs. It is the next best thing to having her stitch it out for me!

The "Home for the Holidays" machine embroidery design is actually available for FREE on YCMT's sister site, SWAKembroidery.com . Shelli has so many other charming designs at SWAK, I just had to try out a few more for this project.


This is the Joyeux Noel design. I adore the topiary and the holly leaves. I really want to make myself a decadent throw pillow using this design (someday...sigh).


This is my all-time favorite! I made two of these - one for my mom (because I wouldn't dare make these for her pals and not reserve one for her) and one for her Red Hatter partner-in-crime Selma.

The door hanger instructions suggested adding batting behind the stitching. I'm the worst hooper in the world, so I just hooped the stabilizer, and pinned the batting and the fabric on top of that. It worked beautifully! The light, airy, "prim" designs are really perfect for giving a quilted homespun look.

Not only did the design stitch out in a jiff, but the hangers went together very quickly too. I sewed them up "assembly line" style, and I used my 1/4" piecing foot. It is amazing how the guide on the side of the foot makes stitching so much more accurate (you'd think a 1/4" seam allowance would be easy for me by now, but I tend to daydream and wander all over the place).


My parents were actually here for the last 3 days, so my mom got to see these babies go together. She is thrilled with the results, and can't wait to give them to her friends.

Since my favorite babysitters were here, I was able to get a lot of work done. I actually started on a new pattern - YAY! I'm not quite ready to reveal what I'm working on, but I'll give a few hints...

1) It is for girls and boys
2) It is super easy to make
3) It is FESTIVE!!!

This particular garment is perfect for the holidays, so I am going to work my hardest to get it out before the middle of the month. I still have lots of gifts to make, too, so I'll be spending lots of time "at the bench," so to speak :) .