

Reversible pants are really easy to make. Basically, you make 2 pairs of pants, sew the waist edges together, flip everything right side out, and finish off the leg openings. Of course, that last finishing step can make or break the entire garment. The pants pieces have to be perfectly aligned to get nice stitching on both sides. I've been making reversible pants ever since Lou was a baby, and have been optimizing my "protocol" along the way.
Pattern modification
If you are using my Easy-Fit Pants pattern, very little modification is needed. To calculate the length needed to make pants with a 3" cuff, plug the current outseam measurement into the basic pants formula.
Draw the pattern as the instructed, then take 3/4" off the top. You are ready to go!
Figure 1: Easy-Fit pattern modification

If you are using a commercial pattern, you will need to shorten the casing and and lengthen the legs. In the illustration, I show a 1 piece pants pattern (meaning no side seam), but you could make the same modifications to both pieces of a two piece pattern.
The top cutting line should be a half inch above the original top of the finished waistband. Some patterns have the waistband position or the casing allowance marked right on the pattern. If not, look at the instructions to determine the casing allowance. It will probably be between 1 and 1 and 1/2", depending on how the wide the casing is and how it is finished. Since the elastic will be inserted between the two layers of pants, you will cut off all but 1/2" of the casing.
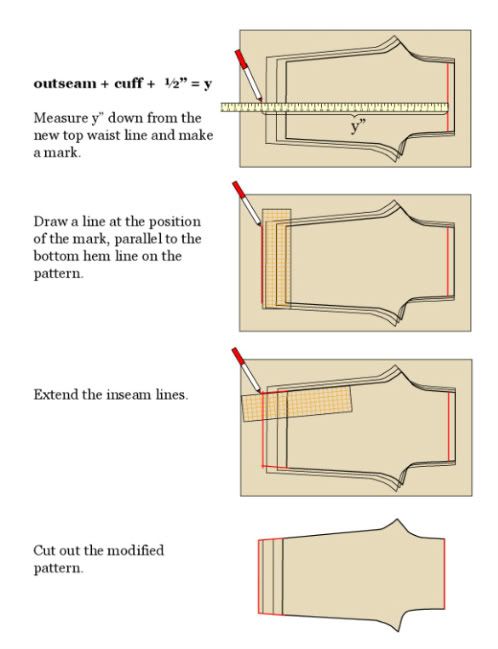
Once you know where the top of the pants will be, you can calculate how long to make them. Determine the current outseam by measuring the recipient or a pair of pants that fit them right now (I'd much rather measure clothes than wiggly children). Add in the desired cuff length (I usually go with 3") and 1/2" to account for the top allowance.
Figure 2a: Paper pattern modification
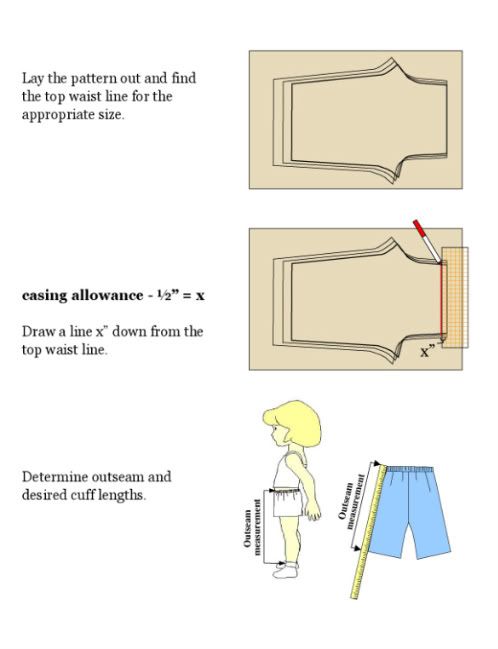
Figure 2b: Paper pattern modification (continued)
Cutting
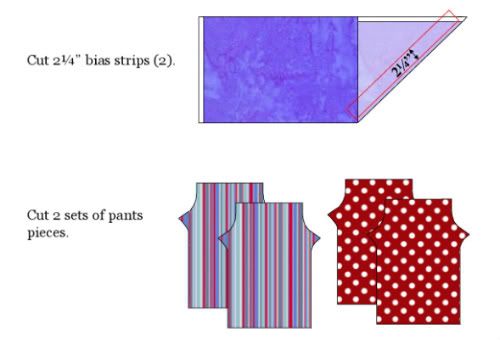
You will need 2 bias-cut strips that are 2 and 1/4" wide. I make my strips by folding a half yard of fabric diagonally and cutting the strips very close to the fold. This gives strips that are about 25", which is ample for most sizes. If you are making a pair of very wide legged grown up pants, you may need to start with a larger cut of fabric. After you cut the strips, trim them so that they are slightly longer (about an inch) than the width of the bottom edge of the pants pieces.
Cut 2 sets of pants pieces using the modified pattern.
Figure 3: Cutting
Cuff Preparation
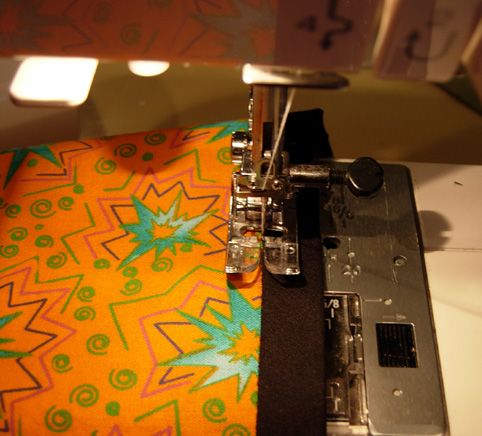
You will stitch the strips to one set of pants pieces, 1/2" from the edges. I'm usually a "minimal pinner," but in this case I recommend using plenty of pins to keep the bias strip from stretching and distorting.
You will stitch the strips to one set of pants pieces, 1/2" from the edges. I'm usually a "minimal pinner," but in this case I recommend using plenty of pins to keep the bias strip from stretching and distorting.
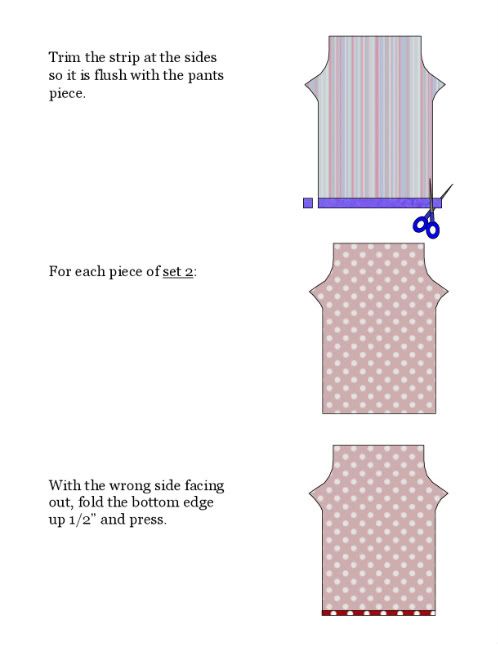
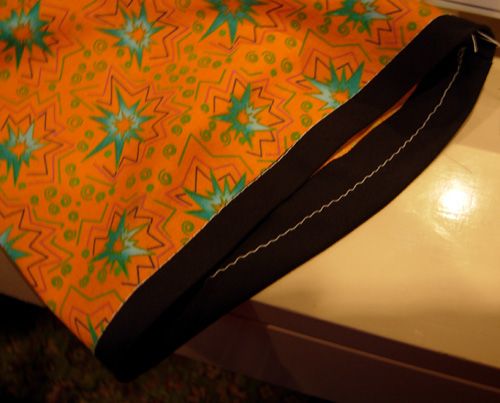
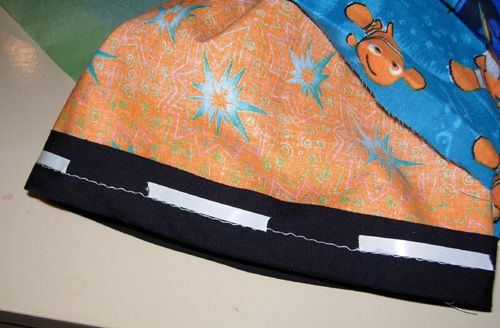
After stitching, the strips are pressed down and over the edge of the pants leg, and are then trimmed flush.
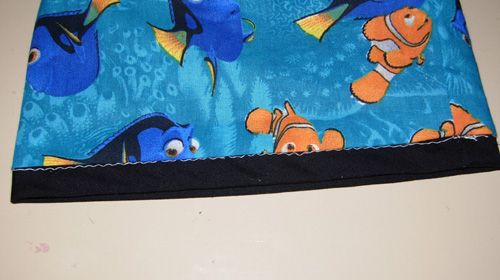
The bottom edges of other set of pants pieces are folded under 1/2". If you have the Easy Fit eBook, you can use your folding template here :) .
The bottom edges of other set of pants pieces are folded under 1/2". If you have the Easy Fit eBook, you can use your folding template here :) .
Figure 4: Pinning and stitching the bias strips
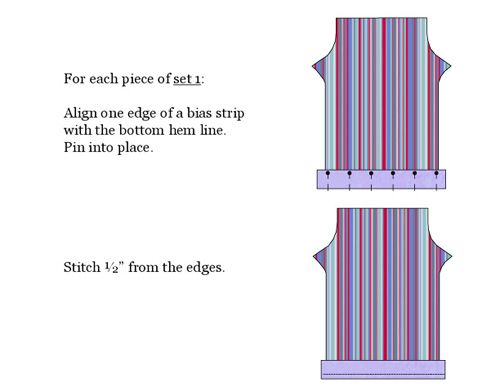
Figure 5: Pressing the bias strips
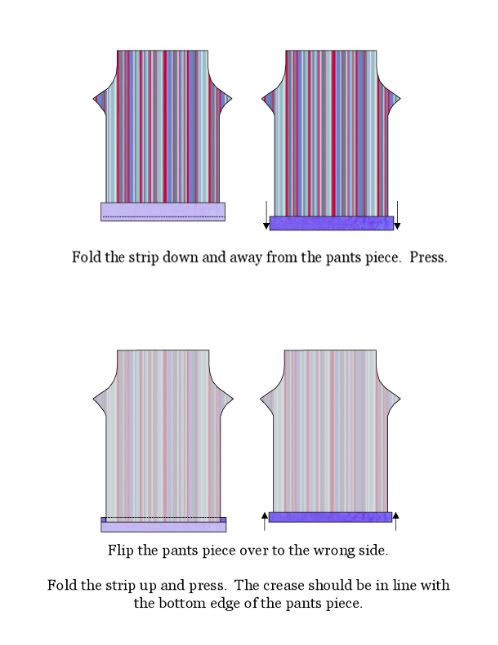
Figure 6: Trimming and pressing
Pants Assembly
Sew the pants together as instructed. Unfold the leg openings before you stitch the inseam.
Since the edges will be incased, there is no need to edge finish (though you certainly can zig-zag or serge if are fanatical about those kinds of things). If you are working with a commercial pattern, trim the seam allowance down to 1/4" (you are already there with the Easy-Fits).
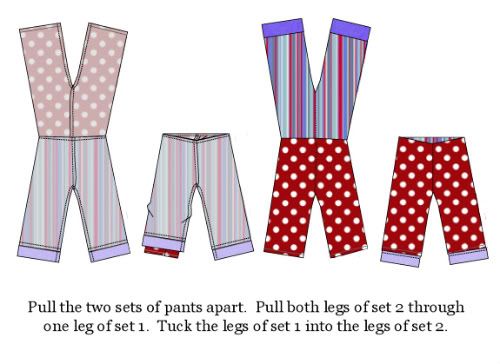
The two pairs of pants are then put together, right sides facing, and sewn together 1/4" from the top edges. The pants are then tucked, twisted, and turned so that the right sides are facing outward.
Sew the pants together as instructed. Unfold the leg openings before you stitch the inseam.
Since the edges will be incased, there is no need to edge finish (though you certainly can zig-zag or serge if are fanatical about those kinds of things). If you are working with a commercial pattern, trim the seam allowance down to 1/4" (you are already there with the Easy-Fits).
The two pairs of pants are then put together, right sides facing, and sewn together 1/4" from the top edges. The pants are then tucked, twisted, and turned so that the right sides are facing outward.
Figure 7: Sewing the pairs of pants
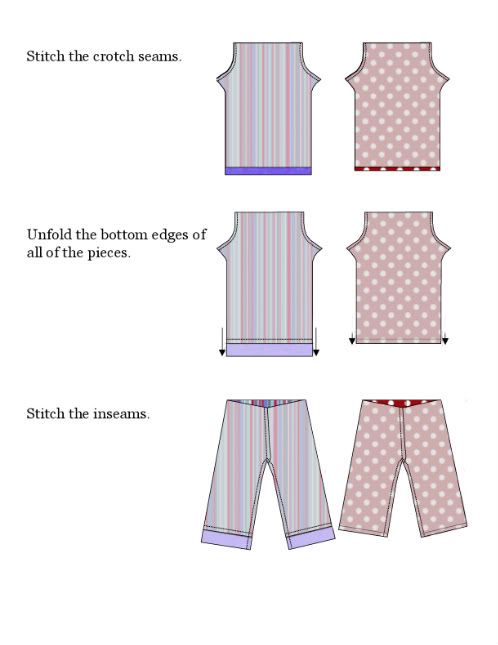
Figure 8: Putting the pairs of pants together
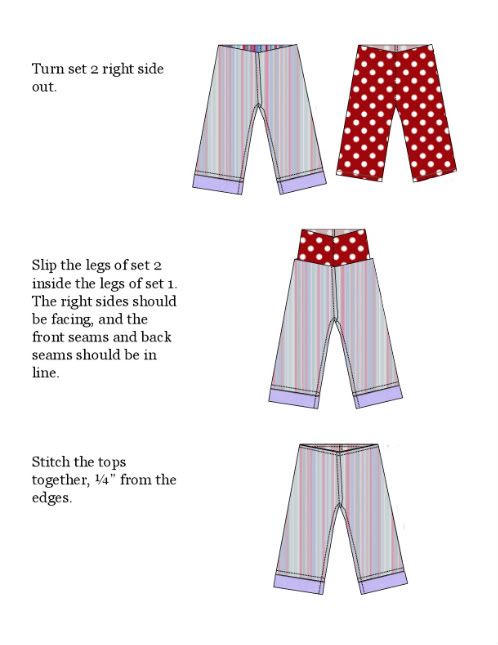
Figure 9: Turning the pants right side out
Casing
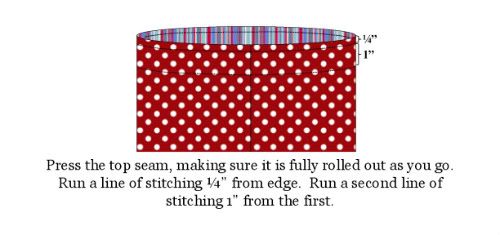
The casing is formed by running two lines of stitching, 0.25" and 1.25" from the top edge. Don't worry about leaving an opening for the elastic - we will make that later.
Figure 10: Stitching the casing
The casing is formed by running two lines of stitching, 0.25" and 1.25" from the top edge. Don't worry about leaving an opening for the elastic - we will make that later.
Figure 10: Stitching the casing
Finishing
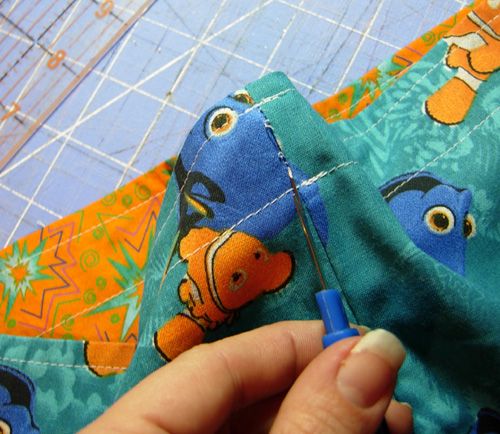
I'm going to switch over to step-by-step photos to illustrate the all-important final steps for each pant leg .
Refold the strip into place against the layer to which it is attached. Stitch right through the seam on the right side with a basting stitch (long stitches, low tension). Make sure the other pants layer is out of the way at this point.
This stitching serves two purposes - 1) it provides a perfect alignment reference for the other layer and 2) it keeps the strip perfectly positioned when the layers are stitched together.
I use my all-time favorite notion, Wash-Away Wonder Tape for the next step. You can find it in at most fabric stores (at my JoAnn's, they hide it with the quilting supplies).
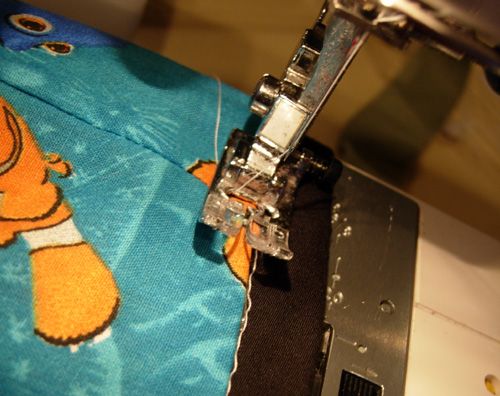
Stick pieces of Wonder Tape just above the stitching as shown in the photo (yes, I am stingy, but the small pieces are also easier to position).
Stick pieces of Wonder Tape just above the stitching as shown in the photo (yes, I am stingy, but the small pieces are also easier to position).
Peel away the backing, and align the folded edge of the other layer with the basting stitch. Press with your fingers to get a good stick.
Stitch through all of the layers, 1/8" above the folded edge of the taped pants piece.
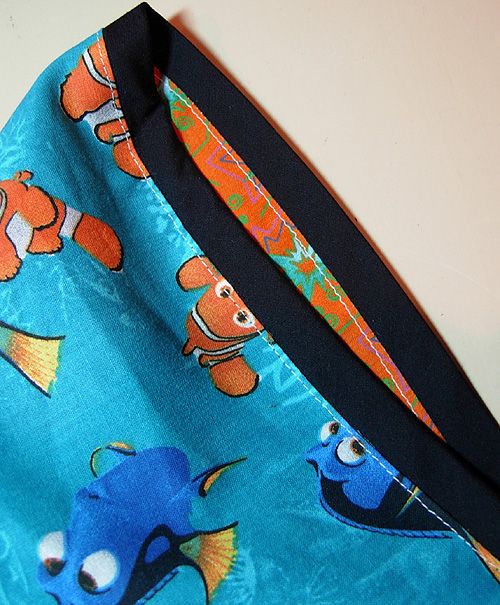
Remove the basting stiches. Voila - a perfect finish on both sides!
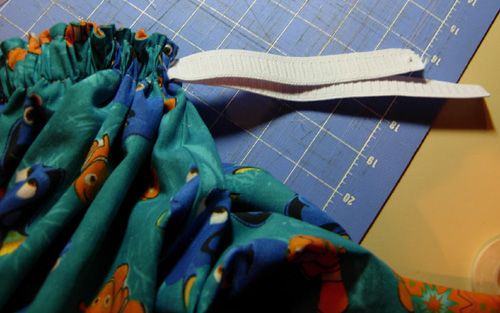
Of course, we aren't finished until we put in the elastic. Using a seam ripper (usually reserved for disasters, I know), pick out the back seam between the two lines of casing stitching.
Insert the elastic into the resulting opening. Pull through, and stitch the ends together your favorite way.
Arrange the folds in the openings back into place, and stitch through all layers, very close to the folded edge.
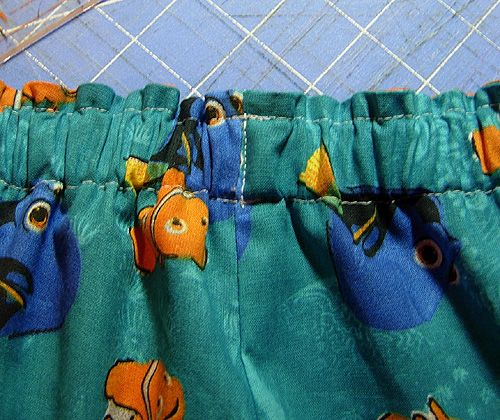
And there you have it - reversible, cuffed pants that will grow with your child!

22 comments:
WOW Carla! You are so amazing!
Thank you SO very much, I can't wait to try these! Perfect for little ones!!!
OK Carla, Supermom extraordinaire! You've added blogging to the insane list of things you get done in a day and I am beside myself. Boy am I Lazy!! LOVE LOVE LOVE the reversible Easy Fits! I see many of them in my future. Just think of how easy it will be to pack for disney w/ half the pants LOL. Hopefully we'll have a brand new baby girl so I can make her stuff to match her big sis!!
Your blog is great, I broke my NO SURFING until after the holidays rule just to check it out!
Hope you, Louie and Delmar have a WONDERFUL Christmas!!!
...t.
Thanks for posting this!! I can't wait to give it a try!
Leslie
Thank you for posting a tutorial. I will definitely be using this for the next time I make some pants for DD>
You are so way cool to share that!
Wow - How cool is that!!! I'm going to be making a pair of the Easy Fit Pants in the next couple of weeks and I think I'll have to try this. Thanks!!
Very cute! I can't wait to try them!
I can't wait to try this! I have so many ideas for it now running around in my head! Trust me that is scary! LOL
Thanks for posting this Carla!
I can see these as being a warmer alternative for winter! A nice cozy pant for the colder months!
Carla~ You rock! :) I absolutely adore the easy fit pattern. My girls have lots of them. I'm going to have to give the reversibles a try after the holidays.
Carla! WOW! Now your blogging on top of everything else! Where do you find the time? You are amazing! Love the blog and thanks again for the tute!
Thanks so much Carla! I can't wait to make some for Lily!
YOU ARE A-MA-ZING my friend!! Thank you for posting this! I'm definitely going to give this a try -- such a cute look, great idea for versatility, and awesome instructions as usual! Thank you!!
-Kim :)
Wow Carla! You never cease to amaze me! Thank you for such wonderful directions on how to do this. I thought I loved this pattern before, and now I do even more!
That is so cool! I am definitely going to try that.
Thanks for the reversible pants tutorial, Carla! These would be great for trips to Disney, to save on the amount of clothing you need to pack!
Thank you !
Your so cool to post this!
You could have made these into another complete book (and still should?). It would be a hit. I know I'm going to make these ASAP. THANKS !!!!
It has been a joy getting to know you better on the Thrifty Fifty Blog. I was and still am so pleased to have been on your team. I look forward to buying more of your patterns soon.
Krista F
Hey Carla!!! Thanks for posting the link to your blog!!! I love the reverisble pants tutorial!!!
i did it!
i found you while Google-ing reversible pants and scratching my head. I had the 2 pants, but the puzzle of construction was too much for me.
They turned out beautifully.
Thanks so much!
I don't have kids (and naturaly no grandkids either :-P), but I suddenly realized that it's the ideal pants to make for going on vacation! Just use thin material (so it doesnt turn into winter pants) and and some much needed pockets. Can't wait to try it!!
Thank you so much!
All I can say is Finally found them!, I had the one piece patterns in sizes 2T to 18 women 25 years ago, stopped sewing 20 years ago and now I've restarted and could only find my size 7-14 child patterns, now thanks to you I can make my own. God works in mysterious ways, my granddaughter is 5 so the 7 was perfect and now no worries!
This is genius!! I love it!!
Post a Comment