
Silk ribbon embroidery is my absolute favorite form of embellishment. If you take a look at my gallery of collector doll clothes, you'll see that I added silk ribbon roses to just about every design. It is such a great way to give dimension and vintage sweetness without a lot of time or effort. In fact, I find silk ribbon embroidery to be MUCH easier than floss embroidery. Sure, there are fussy ways to make just about any type of intricate flower, but it is hard to beat simple little roses. Yesterday I made this candle cozy in about 15 minutes using only knots and straight stitches.

For this project, I used four different ribbons - 13 mm dark pink for the big roses, 13 mm white for the bow, 7 mm green for the leaves, and 7 mm light pink for the small roses. You can usually find the ribbons in packets at fabric and craft stores. If you want to get into some serious silk ribbon embroidery, eBay is a much more cost-effective source. I actually dye my own ribbon. I buy it by the roll from Dharma Trading, and do it up Easter Egg style with RIT dye. I have lots of colors on hand, but I always find myself reaching for the pinks, creams, and greens. It probably has something to do with the fact that roses often come in those colors :) .

As I mentioned, there are lots of proper techniques for making silk ribbon flowers. Quite a few articles and tutorials are available online, in fact. To show just how stinking easy it can be, I'm going to share two super-simple stitches. For both of these stitches, I use a thick, sharp tapestry needle.
The first stitch is a knot. It isn't a French knot or a bullion knot, it is just a plain old knot. Thread a length of ribbon (I usually work with about 18" at a time) and tie a tight knot in the end (1). Stick the needle into the fabric at the desired position and pull the ribbon through (2). Tie a very loose, airy knot close to the fabric (3). The key to maximizing your ribbon and getting that dimensional look is resisting the urge to pull things taught, in fact. If you do over-tighten a knot, you can always stop and fluff it up. After you make your knot, reinsert the needle into the fabric near the knot and bring it through, again keeping everything light and loose (4). Voila, a rose (5)! If you are only making one rose, carefully tie off a tight knot in the back and cut the ribbon. If you are making another rose nearby, proceed to bring the needle through at that position, taking the utmost care not to pull on your first rose.
The first stitch is a knot. It isn't a French knot or a bullion knot, it is just a plain old knot. Thread a length of ribbon (I usually work with about 18" at a time) and tie a tight knot in the end (1). Stick the needle into the fabric at the desired position and pull the ribbon through (2). Tie a very loose, airy knot close to the fabric (3). The key to maximizing your ribbon and getting that dimensional look is resisting the urge to pull things taught, in fact. If you do over-tighten a knot, you can always stop and fluff it up. After you make your knot, reinsert the needle into the fabric near the knot and bring it through, again keeping everything light and loose (4). Voila, a rose (5)! If you are only making one rose, carefully tie off a tight knot in the back and cut the ribbon. If you are making another rose nearby, proceed to bring the needle through at that position, taking the utmost care not to pull on your first rose.

The next stitch is the straight stitch. Knot the ribbon at the end, pull through (1) and put back in (2). That makes a cute little leaf (3).

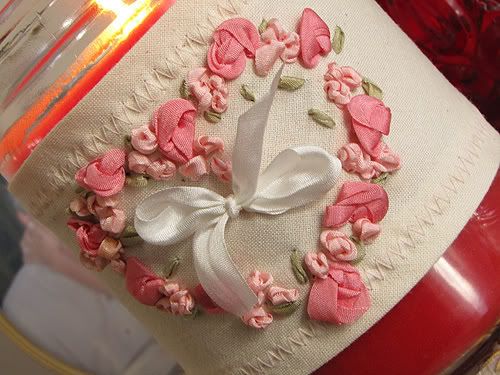
OK - yawn. One little rose isn't all that exciting. The way to make an embroidery impact is to put together clusters of roses of multiple sizes and colors, like I did on my candle cozy. The cozy, by the way, is just a strip of muslin cut on the bias. I measured the jar (1) and made a pattern that was 4.5" wide by 6.75" wide (1/2 the circumference of the candle + 0.5" seam allowance). I folded the corner of the fabric up into a triangle, and cut the pattern on the fold (2). I folded the top and bottom raw edges over, stitched them into place with a zig-zag, and drew a heart in the center (3).

I generally don't start out with a set plan or pattern when I do silk ribbon embroidery. I started this wreath with big, loose knots using the wide dark pink ribbon. My knots aren't all identical, which is fine because no two roses are identical.

The big roses always come out a little puffy for my tastes, so I just smash them with a hot iron.

Roses need greenery, so I worked around the wreath, giving each rose two or three straight stitch leaves.

I filled in with clusters of small roses (I generally don't press these).

I decided that the center needed something, so I added a bow. I pulled a length of ribbon through the fabric with the needle.

I then tied the bow and trimmed the ends.

Since the cozy was cut on the bias, it was a bit stretchy. I ended up placing my stitching 1" from the ends and trimming the allowance.

I slipped the cozy over the jar, and grouped it with with a wedding picture and a vintage candy dish. I lit the candle...instant romance!

23 comments:
Carla, I LOVE this tut!!! I have been wanting to make some vintage-y pillowcase dresses and peasant dresses for a local antique/replica dealers shop and these ribbon roses will be the perfect accents! I also now have a great idea for a baby gift I've been racking my brain over using your 6.mo old trifecta of patterns, some shantung, lace and now silk ribbon!!! I can hardly wait to start shopping for the fabrics!!
As always, you've outdone yourself Carla!!! This is on my to-do list, that's for sure! Thanks!!
Oh, wow, that is so cool! I did a few ribbon roses when I scrapbooked, I don't know why I didn't think of them on clothes. I don't think I am up to dying the ribbon; you are so smart. I am off to go look at the doll clothes now!
LOVE this! I think I need to give it a try. Thanks for the great tutorial!
Why did you choose to cut the candle cozy on a bias? Did it need to have stretch to fit over the candle? What is the thought here?
Love it, love it, love it!! What a fun technique -- I'm definitely going to try this!! Thanks C!
Kim :)
That is AWESOME Carla! You have me (who hates to hand sew!) wanting to do a hand sewing project!
You are amazing!
Thanks so much for sharing with us! `
I just left a comment but it was mysteriously lost in cyber space! :)
Anyways, I was praising this tutorial that I HAD to try. It was so darn cute. I posted a picture on my blog. Mine is not nearly as nice as yours, plus I didn't have the skinny ribbon to make the filer flowers, but I still love my imperfect heart. :)
Oh, and I did not get mine done in anywhere near 15 minutes, you must just be a sewing genius!
Carla - that is beautiful!! I'm going to give it a try and maybe embelish some sets too!
My goodness, that is just so pretty Carla!!! I need to try that!
Gorgeous Carla! I'm going to have to give this a try, and I'm also going to have to try dying my own ribbon at some point.
Thank you for the tutorial!
WOW! Carla this is awesome.
Very beautiful.
Pookie
Gorgeous Carla!
That is so beautiful- TDF! What a wonderful gift idea. Thank you for the great tutorial :)
I got my ribbon in the mail today. Now I need to go buy the dye. Do I get the liquid RIT? Just pour it in a bowl and dip the ribbon?
Hey Shannon! I've used both liquid RIT and powdered, and they both work pretty well. I find the liquid easier to work with, especially in very small batches.
The way I do my dying is to start out pretty concentrated. I'll dye a few ribbons the intense color, take them out, and add some water to the dye bath. Then I'll dye a few more ribbons, take them out, and add more water. I'll keep doing this until I have a nice gradient of colors. Don't forget to leave some white ribbon - it is easy to get carried away! Rinse all of the ribbons in cold water before drying and storing.
Can't wait to see what you make!!!
Beautiful! I would love to try this sometime!
OMGarsh....this is soooo cute! I think I will have to try putting some of these gorgeous roses on some of the customs I am getting ready to make! Thanks so much Carla for your wonderful ideas and talent!!!!!!
so much talent in one little body..Happy Holidays to you Del and Louis!! love you all so much.
Hi!
Wanted you to know that I posted a link to this tutorial on my blog today.
Nancy ward
http://www.nancywardcrafts.com
Carla, Thank you so very much on the info for the silk ribbon! I have spent a bloody fortune on little packets, and now I can dye to my hearts content and it will not cost me my next mortgage!
You Rock!
Very romantic
What an idea. This is simply great. I will definitely try it. Embroidery Digitizing Service
That looks so easy, even I could do it! Thankyou. Who would imagine that such a simple thing could look so gorgeous!
Post a Comment